A short summary of steps we covered in my Mixed Media Art Journal workshop. A refresher to help you continue with your book and start a new book. Feel free to email me with any questions at jacqueline@thecreativitycurator.com
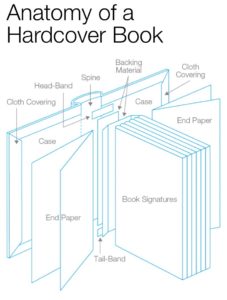
- Isolate a signature. The following picture shows signatures bound in a book. On the left is a book that has been glued together; on the right is a book that that has signatures that have been stitched together.
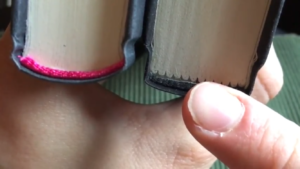
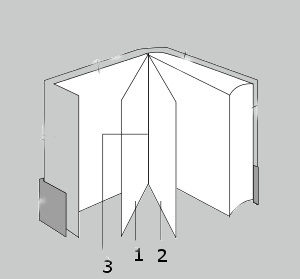
- Locate the center fold of the signature – i.e. where the signature has been stitched together.
- Remove center pages from the signature. One set of pages at a time, along the stitching. In the illustration you will be removing the pages marked as 1 and 2 – the stitching is item 3.
How many pages to remove? Signatures are commonly made up of 8-64 pages in multiples of 8 and 12 (8, 12, 16, 24, 32 and 64 pages), but could be larger or smaller. How many pages you will remove depends on the size of the signature.
Why will you remove pages? As you paint, collage, etc. in your book the book’s binding will need to be able to hold up to the increased thickness of the book. So you will remove pages in order to add your artwork and not break the book’s spine. However, you will also want to leave enough pages to attach the first and last pages of the signature to the rest of the book (see step six). If you are not starting a new book, but preparing a signature in an existing book continue on to step six.
- Glue the front-end paper(s) to the front cover of the book. Glue the back-end paper(s) to the back cover of the book. See the illustration below. If your cover is starting to disconnect from the signatures, you may want to glue down additional pages to the front and back covers.

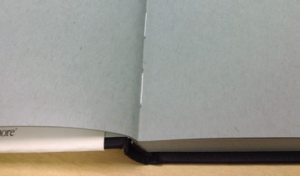
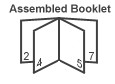
- Go back to the originally chosen signature. Glue the first page of the signature to the last page of the previous signature. Glue the last page of the signature to the first page of the following signature. In the illustration below the first page is numbered as 2 the last page is numbered as 7. You will repeat this step as you work on the book to strengthen it.
- As you work on your book repeat steps 1, 2, 3, 4, and 6. In general, depending on the paper weight of the pages in your book, you may want to glue 1 or 2 pages or more together to make stronger and heavier pages to place your artwork on. The corners are where the pages are most likely to come apart, usually from turning the pages, so be sure to glue the corners.
The most important step is to relax and enjoy the process. There is no right or wrong way to do this. Focus on setting aside some time for your creativity, not necessarily how you take apart and re-assemble the book. And calming your mind – turning off the chatter in your head by allowing your creativity to flow.
You can just open a book and start to create in it, without any preparation to it. This is just one way to prepare a book for alteration and at the same time repair pages that may be falling out and to keep the book from coming apart as you tug, pull, glue, paint . . . in it 🙂
Have a good time and say yes to your creativity – Jacqueline.
MIXED MEDIA ART JOURNAL WORKSHOP
Stitched Book Preparation
THE CREATIVITY CURATOR
JBV DESIGN STUDIO
JACQUELINE BURKE VOLPE
thecreativitycurator@gmail.com
jbvdesignstudio@gmail.com
Illustrations/photos have been modified from Wikipedia / Wikimedia images.